Tutorial-2: Creating a Unity WebGL Game
In this tutorial, we'll create a Unity WebGL game and publish it for web deployment following the guidelines provided in the Unity Learn tutorial. Here is an example of a Unity game with blockchain capabilty. Visit Github Page. Test this game.
Pre-requisites
Before we begin, ensure you have:
- Unity installed on your system. You can download Unity Hub from the official Unity website.
- Basic understanding of Unity interface and game development concepts.
Steps
Step 1: Create a New Unity Project
- Open Unity Hub and create a new 3D project.
- Set up your project with desired settings and save it.
Step 2: Create a Game based on tutorials
There are plenty of tutorials on how to create games. You can look into sources like Unity tutorial, Youtube tutorial, and more.
Step 3: Build Settings
- Go to File > Build Settings.
- Select WebGL as the platform.
- Click on Switch Platform to set the platform.
- Adjust other settings such as resolution and quality as per your requirements.
Step 4: Scene Setup
- Create your game scene by adding objects, characters, and environment elements.
- Set up lighting, cameras, and other necessary components.
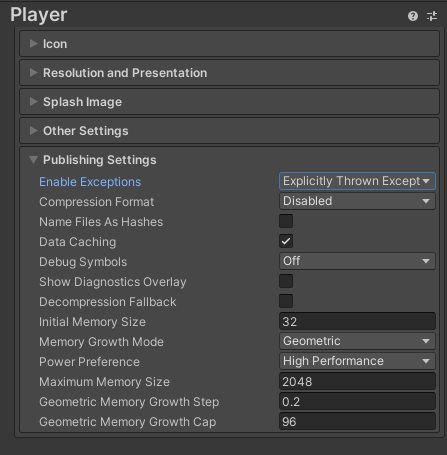
Step 5: Player Settings
- Go to Edit > Project Settings > Player.
- Configure player settings such as resolution, fullscreen mode, and splash image.
- In the publishing settings, make sure that you set the
Compression FormatasDisable.
Step 6: Build the Project
- Go back to Build Settings.
- Click on Build and choose a location to save the build files.
- Unity will compile the project into HTML, JavaScript, and other necessary files for WebGL deployment.
Step 7: Publish the Build
- After the build process is complete, you'll find a folder containing the build files.
- Upload these files to a MetX Games platform to make your game accessible online.
Step 8: Test the WebGL Game
- Open the HTML file generated by Unity in a web browser to test your WebGL game.
- Ensure that all functionalities and features work as expected.
Step 9: Optional: Further Customizations
- Customize the game further by adding audio, animations, UI elements, and other interactive components.
- Experiment with different gameplay mechanics and visual effects to enhance the gaming experience.
Conclusion
You have successfully created a Unity WebGL game and published it for web deployment following the steps outlined in the Unity Learn tutorial. Share your game with others by hosting it online and enjoy the process of game development and sharing your creation with the world!
Now, go ahead and unleash your creativity to build amazing WebGL games using Unity!